HOW TO ROOT REALME NARZO 20 PRO: STEP-BY-STEP GUIDE
Realme has recently launched its Narzo 10 series successor called the Realme Narzo 20, 20A, and 20 Pro. In this article, we will guide you on how to root Realme Narzo 20 Pro. Before rooting your device, your device must have an unlocked bootloader. We will also discuss how to unlock bootloader in your Realme Narzo 20 Pro. Rooting can be done in many ways. However, in this article, we will discuss how you can root your device via Magisk. Firstly, for people who are new for unlocking bootloader and rooting a device must know what is rooting and how does it affect your device. So, without any further ado, let’s head into the article
How to Unlock Bootloader in Realme Narzo 20 Pro
Pre-requisites for unlocking bootloader is given below:
- Unlock Tool APK
- SDK Platform Tool – DOWNLOAD
- TWRP for Realme Narzo 20 Pro
- Magisk Zip – DOWNLOAD
- 75%+ Battery
- And Obviously a PC
Now you can follow the steps below to unlock the bootloader. Follow the steps carefully or you may stick in the Bootloop or damage your software.
- Step 1 – Download and install the Realme Unlock Tool on your device.
- Step 2 – Open the Unlock Tool APK and Tap on “Start applying”.
- Step 3 – After that, accept the agreement and tap on the “Submit Application” Button.
- Step 4 – The application will be submitted and Realme Officials will review it. It may take approximately 1 hour, so you have to wait and let them check your application.
- Step 5 – You will see the message “Review Successful” in the app. Now you can proceed to unlock the bootloader.
- Step 6 – Tap on Start the in-depth test from the app. It will automatically reboot your phone into Fastboot mode. Now you can plug your device into the PC after successfully entering the Fastboot mode.
- Step 7 – Download and Setup the SDK Platform Tools on your Windows PC. Then extract the downloaded zip file on your PC.
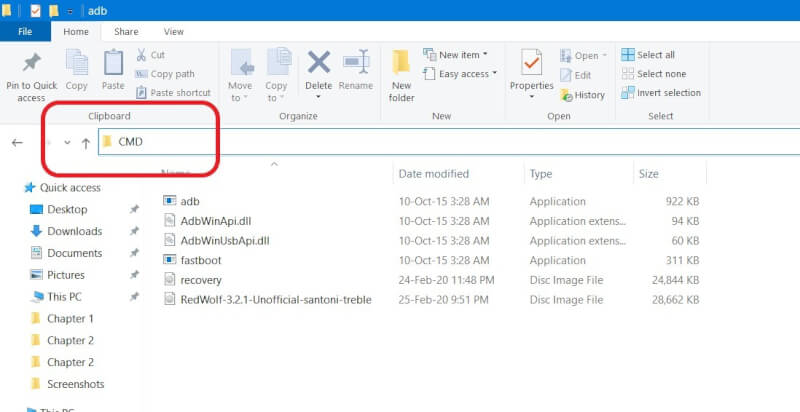
- Step 8 – Now, open the extracted folder and type “CMD” on the address bar and hit Enter to open CMD.

- Step 9 – Now enter the following command and press enter to continue:
adb reboot bootloader
- Step 10 – Enter the below command which will unlock your bootloader. However, hit the enter button after this command:
fastboot flashing unlock
- Step 11 – Now come back to your smartphone and press the volume down key to select “Unlock The Bootloader” and then press the power button to confirm. Now all data on your device will be cleared and the bootloader will be unlocked. Your phone will boot up normally after this step. Now you can continue to install TWRP recovery on your device.
- Step 12 – After downloading the TWRP file from the given link. Move the TWRP Recovery.img file to the SDK Platform folder and rename the recovery file to twrp.img.
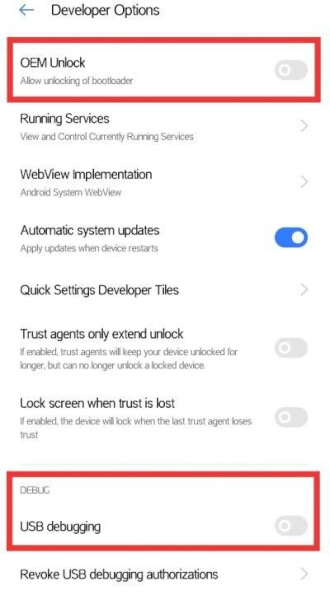
- Step 14 – Then go to your phone and enable developer options in settings and enable USB debugging.

- Step 15 – Open Platform Tools folder and enter the command window as in said in Step 8.
- Step 16 – Boot your phone into fastboot mode by entering the command below:
adb reboot bootloader
- Step 17 – Now enter the command below to check whether your devices are connected or not:
fastboot devices
If your device is not listed in the command window, then plug-out and plug-in the USB cable to your device again and check again with the same command.
- Step 18 – Enter the command below to flash the recovery file:
fastboot flash recovery twrp.img
- Step 19 – Download and install Magisk Zip, and move the Magisk zip file to your phone’s internal storage.
- Step 20 – Now Boot your Realme Narzo 20 Pro to Recovery Mode by pressing Volume Down + Power Button simultaneously until you see the Boot Animation. Then Tap on Install from the TWRP Recovery page.
- Step 21 – Now browse and locate Magisk.Zip file from your internal storage and select it and Swipe To Confirm Flashing.

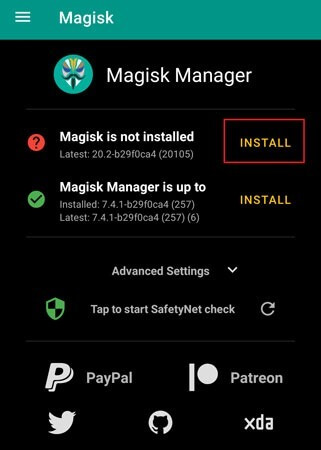
- Step 22 – Then Reboot, and after your phone boots up, install Magisk Manager APK.
Congratulations, You have Successfully Rooted you Realme Narzo 20 Pro device. You can now enjoy flashing custom ROMs and root-only apps and enjoy their features. If you find any kind of issues, let us know in the comments below.
